EXPLORE
Got a Question? Connect with our experts.
Talk to an Expert
Got a Question? Connect with our experts.
Talk to an Expert
What is an MVP?
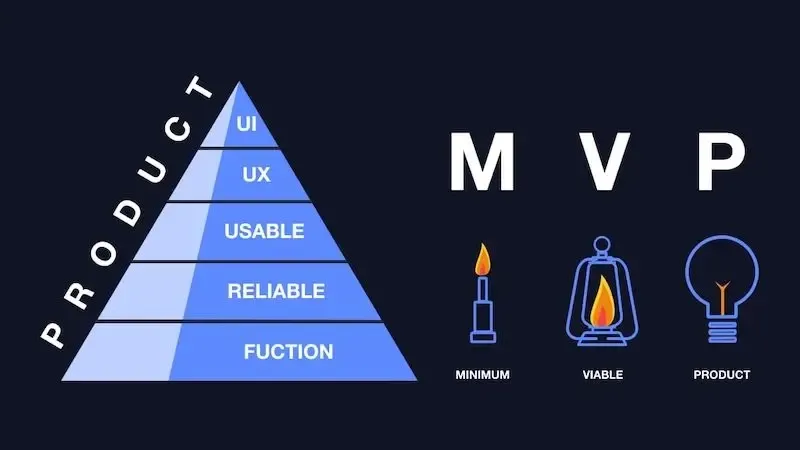
The minimum valuable product (MVP) represents the minimum you can build that adds value to your potential customers.
The goal of building an MVP is to launch quickly, learn from real feedback, and improve over time.
Let’s say you have an idea for a new brilliant product.
How would you go about building it?
A.
Would you start working on a full version of a product that will cost you millions of dollars and years to build before offering it to customers for the first time and actually seeing if the customers are willing to pay for the product you have built?
B.
Would you create a bare-bones version of your product that includes only the most necessary features and bring it to your customers fast? Then improve the product based on how your customers interact with it.
You guessed it! The correct answer is B.
In other words, the correct way of turning an idea into a product is by developing a minimum valuable product first.
Then, make improvements based on customer feedback and data.
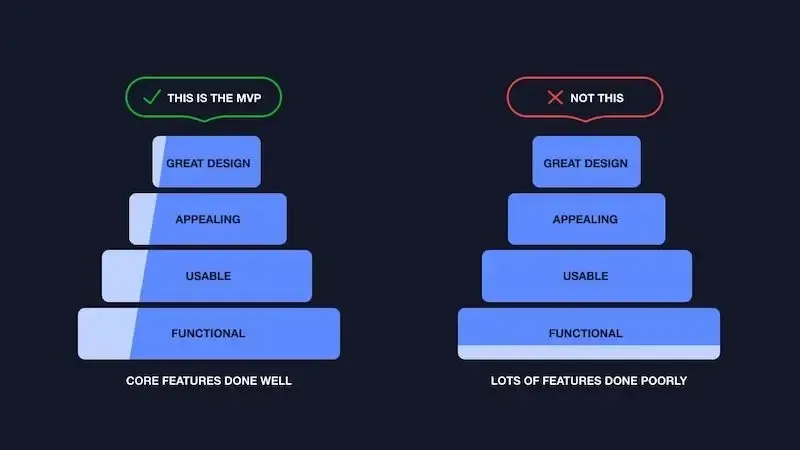
MVP Analogy
Imagine our end goal is to build a car.
However, if you try to create the complete car right from the start, it could take years and a lot of resources, and you still wouldn’t know if users actually want it.
Instead, we start by developing an MVP, a basic version of the product that will help your customers get from A to B.
This could be the simplest version of the car with just an engine, wheels, and a steering wheel. Its goal is to fulfill the client's basic needs.
Based on customers’ initial feedback, we'll make further improvements to our car.
Like adding a bigger trunk, more comfortable seats, a bigger engine, etc.
Next, you add 2 more seats.
Then, an automatic transmission.
All the way until you come to a final product that’s completely based on the customer's feedback.

Here is a real-life example.
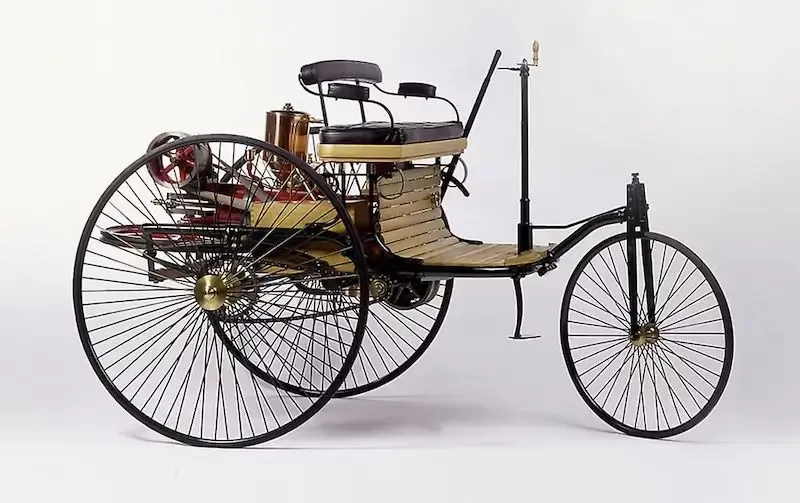
Below is a picture of the first Benz Patent Motor Car.
It had 0.75 horsepower and a top speed of 10 m/h or 16 km/h.
Today, Mercedes-Benz makes cars like this:

4 reasons why you should start by developing an MVP
1. Validate your idea
Building an MVP is one of the best ways to validate your idea.
The main purpose of an MVP is to see if real users are actually ready to buy your product.
Instead of guessing if an idea will work, an MVP lets you quickly launch a simplified version of it and get genuine feedback from users.
This early feedback helps you refine the product’s features, and verify if your product truly addresses a real problem.
2. Faster time to market
Developing an MVP will help you to get your product to market fast.
Speed is one of the key advantages startups hold over traditional companies.
The MVP doesn’t need to be perfect.
It just needs to work well enough to provide value.
This allows you to get to market quickly and get an answer to the most important question of any product:
Are people ready to pay for it?
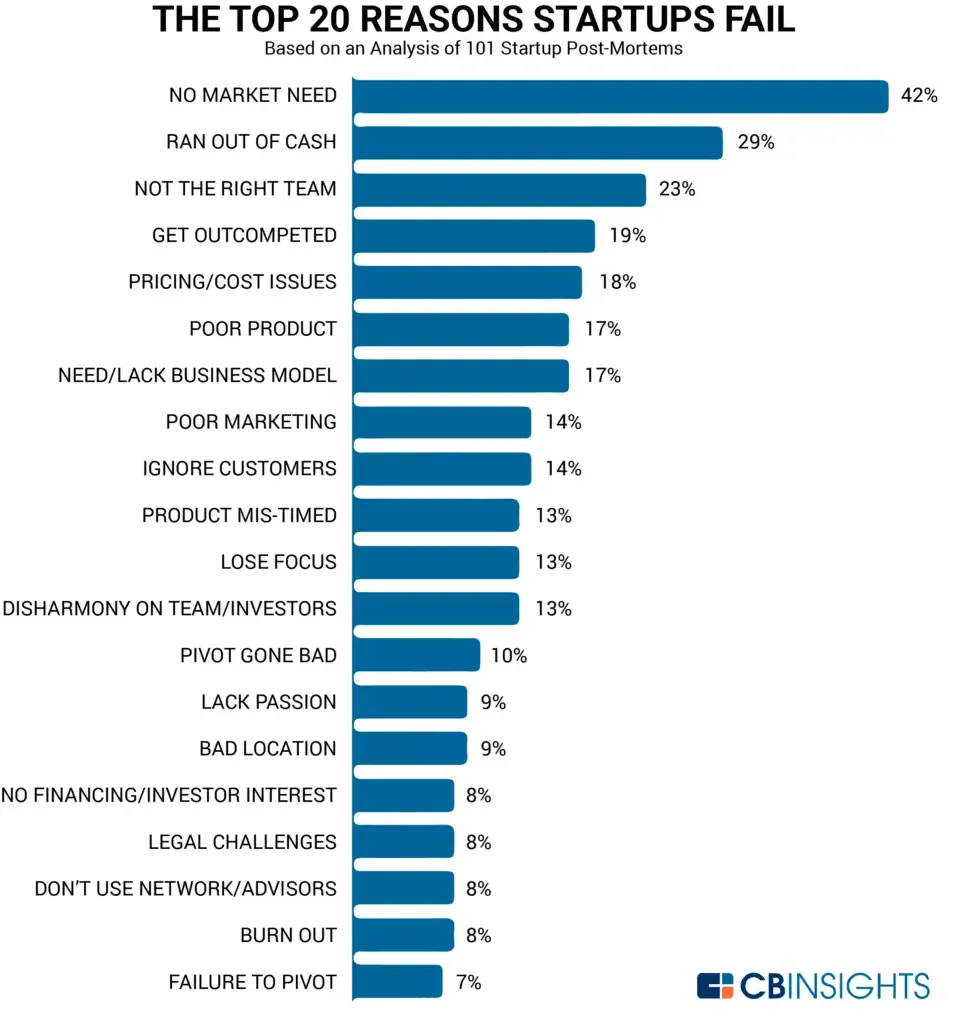
source: CB Insights
3. Cost-efficient development
Usually, startups run on a tight budget.
So, it’s an absolute necessity to get your product to market as soon as possible and get some paying customers.
With an MVP, you concentrate solely on developing your product’s core features. This focused approach is an effective way to cut development costs. Helping you stay on budget.
4. Reduces the Risk of Failure
There’s no guarantee that any product idea will succeed.
By starting with an MVP, you minimize the risk of investing heavily in a product that might not be a hit.
If the initial version doesn’t meet expectations, you can make adjustments based on what you’ve learned, or even pivot entirely in a new direction.
Types of MVP
Single-Feature MVP
As the name suggests, single-feature MVP only includes the core features of your product.
It focuses solely on delivering the main function, making it straightforward.
This is one of the most widely used MVP approaches, as it provides a focused offering and simplifies the process of validating your idea.
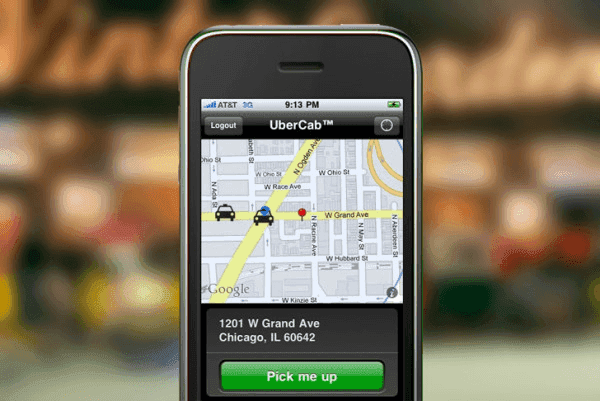
The first version of Uber is a perfect example of a single-feature MVP. Uber's founders wanted to get an answer to a single question:
“What if you could request a ride from your phone?”
source: AppInstitute
Pre-Order MVP
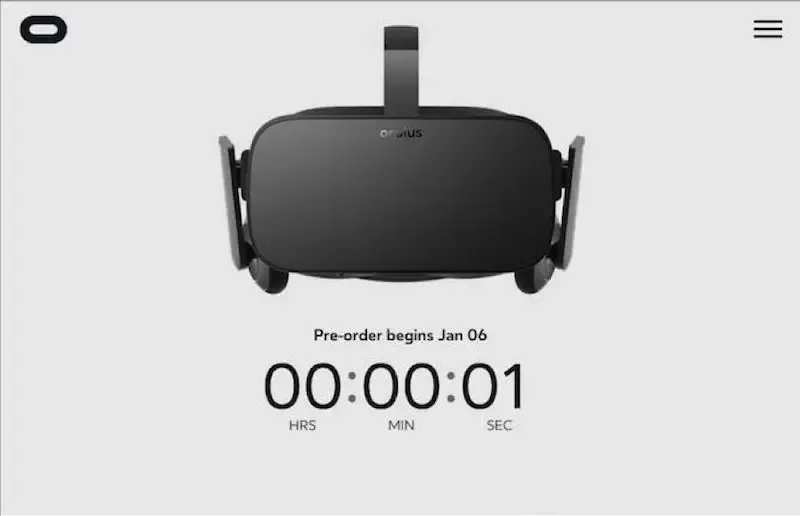
A Pre-Order MVP is about getting people to commit money to purchase a product that hasn’t been built yet.
One of the most common ways to execute this strategy is through crowdfunding platforms like Kickstarter, GoFundMe, etc.
Companies use these platforms to present their product idea, explain how they plan to build it, and detail how the funds will be used.
They also set a funding goal and a deadline, promising to create the product only if they reach the required pre-order level within the specified time.
If the funding goal isn’t met, the company isn’t obligated to produce the product.
source: LinkedIn
Wizard of Oz MVP
An 'Oz MVP' gets its name from The Wizard of Oz.
It’s based on life from a movie when The Wizard of Oz says:
“The magic happens behind a curtain.”
The Wizard of Oz
This means that on the surface, your MVP appears to be fully functional, but behind the scenes, everything is taken care of manually.
Fake Door MVP
A fake door MVP is just a landing page that promotes a non-existing product.
This approach allows you to gauge market interest and validate your idea before committing to building a prototype or full MVP.
Essentially, it works like this, you guide your audience to a landing page where they can express interest, and if they sign up, you let them know the MVP isn’t ready yet but that they’ll be notified once it’s available.

Demo video MVP concept
A demo video is what it says, a simple, straightforward explainer video of your product's key features, value proposition, and the reasons users should choose it.
It’s a great way to showcase the product although some users might prefer a hands-on experience.
Piecemeal MVP
The main idea is to use your existing tools, APIs, or solutions rather than developing unique software.
This type of MVP had a rise in popularity because of low code/no code solutions like, Zapier, Zoho Creator, Make (Integromat), etc.
How to build a successful MVP in 7 steps?
An MVP starts with a problem.
Start by asking yourself, what problem am I actually trying to solve?
If you’re not clear on the problem, your MVP can easily be a miss. You’ll end up building something that no one actually needs.
But when you focus on a real, specific problem, your MVP will become a purposeful solution to their problems. And they’ll be more than happy to pay for it.
A quick tip: Print the problem you are trying to solve in big black letters and hang it above your desk so it keeps you focused during the whole process.
MVP problem-solving analogy

Imagine your hair is on fire! Yes, your hair is currently on fire.
The person next to you has a bucket of water.
How easy it would be for that person to sell you the bucket?
Super easy!
Why?
Because he has a product that addresses your problem perfectly.
This is what you want your MVP to be for your customers.
Step 1. Define your ideal customer
It’s not just about having a product, it’s about knowing who you’re building it for.
If you’re not clear on who your ideal customer is, you might end up creating a product that doesn’t really speak to anyone.
First, start by thinking about the specific type of person who has the problem you’re solving.
- What do they do?
- Where do they hang out?
- What’s their day-to-day life like?
Your goal is to picture them so clearly that you can almost see them in front of you.
Are they busy professionals looking to save time?
A student looking for convenience on a budget?
Ideal customer profile should include:
- Industry: Identify the specific industry or sector your product serves.
- Demographic details: Age, gender, income level, education, and location.
- Psychographics: Interests, hobbies, values, and lifestyle choices.
- Pain points: Specific problems or challenges your product aims to solve for them.
- Buying behavior: How they make purchasing decisions and their preferred shopping channels.
- Usage scenarios: Contexts in which they would use your product.

Once you have determined what problem you are trying to solve and what group of people is facing that problem the process of developing an MVP will become much easier.
Step 2. Define MVP key features
The first thing is to learn which tools, features, and capabilities will be on the “must-have” list for your product.
You differentiate between the must-haves and leave the nice-to-haves for later.
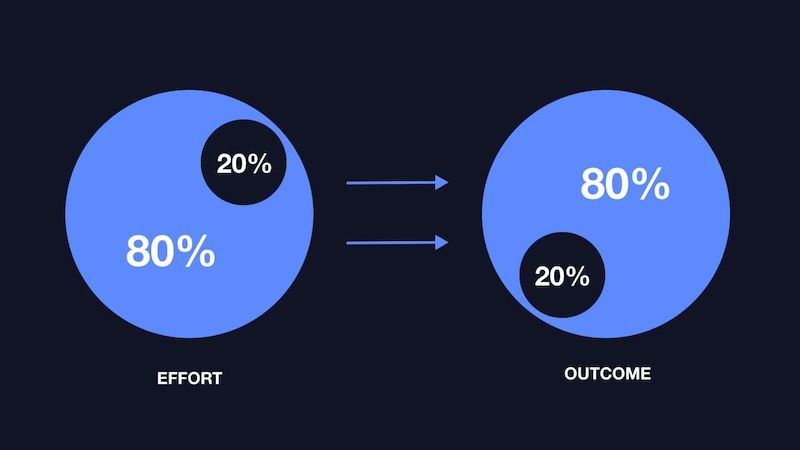
The Pareto principle:
“20% of the causes produce 80% of the consequences, and the remaining 80% of the causes produce only 20% of the consequences.”
Applying the Pareto principle to the MVP feature list would mean that 20% of the features will bring 80% of the benefits to your customers.
MVP = Essential + Simple
There are multiple techniques on how to determine the essential features of the MVP.
The priority Matrix
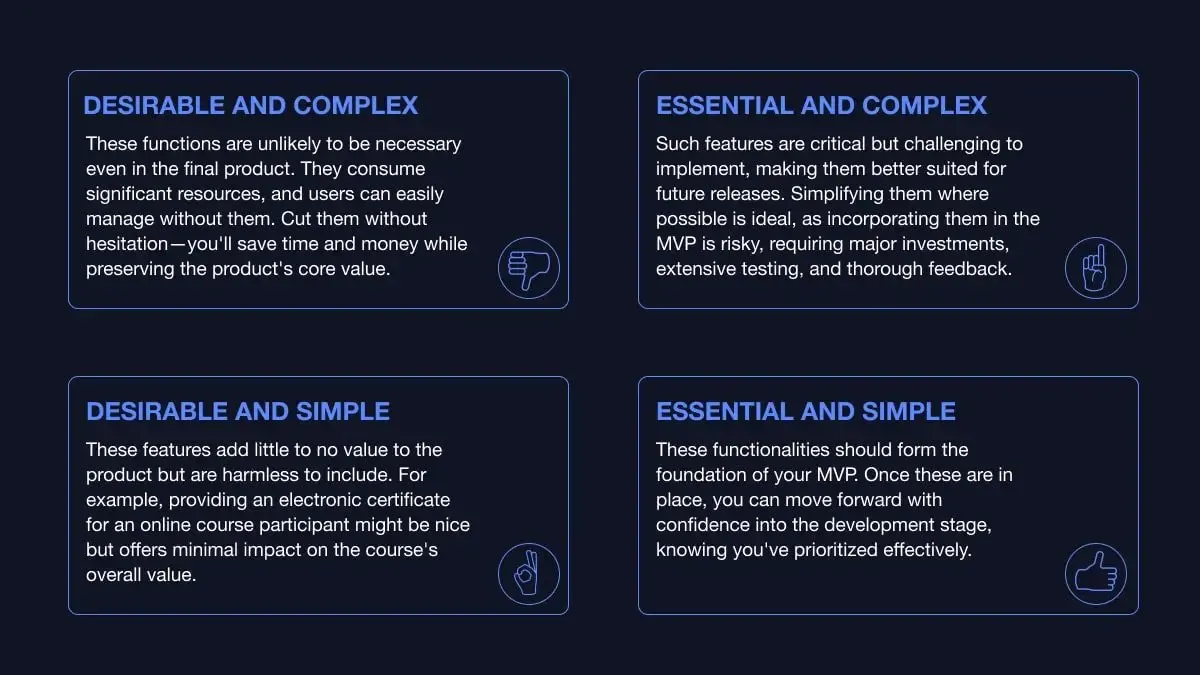
The priority Matrix is a simple yet popular technique that ranks features on scales of “essential” and “simple”.
Imagine drawing two axes.
The horizontal axis represents the complexity of implementing a feature, while the vertical axis measures its importance, ranging from desirable to essential.
To use this approach, place each feature on the grid by answering these two key questions:
- Is the implementation difficult or simple?
- Is it essential or merely desirable for the user?
Here is an example of the priority Matrix:
The RICE score formula
This is another useful technique for prioritizing ideas and features when building an MVP.
It involves evaluating each feature based on four key factors and applying a simple formula to calculate its value.
- Reach – How many users will benefit from this feature? (Base this on real data over a specific time period, not guesses.)
- Impact – How much will this feature improve users’ lives?
Vastly = 3x
Significantly = 2x
Adequately = 1x
Not much = 0.5x
Only a little = 0.25x - Confidence – How certain are you about your hypothesis and the feature's potential success?
100% = High confidence (supported by research or polls)
80% = Moderate confidence
50% = Low confidence
Below 50% = Significant doubt - Effort – How much time and work will this feature take to implement? (Estimate in terms of man-days, with one man-day representing a single developer's workday.)
By analyzing each feature with these factors, you can use the following formula to calculate and prioritize effectively.

The MoSCoW Matrix
The third and our favorite feature prioritization technique is called MoSCoW.
MoSCoW stands for Must-have, Should-have, Could-have, and Won’t-have (at least, not for now).
It’s basically a way to prioritize features so you can focus on what really matters.
Here’s how it works:
- Must-have – These are the essential features. The ones that solve the core problem. If you don’t have these, the MVP just won’t work. Think of it as the heart of your product.
- Should-have – Important, but not deal-breakers. These add value but aren’t crucial for the MVP version.
- Could-have – These are nice to include but aren’t necessary. They’re like the frosting on the cake, they’re not essential, but they’d make the product a little better down the road.
- Won’t-have – These are the features you’re parking for later. They might be great ideas, but they can wait until you’ve validated the MVP and learned from real user feedback.
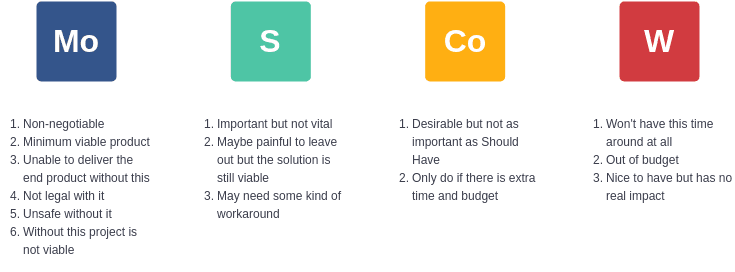
source: Visual Paradigm
Step 3. Determine business model
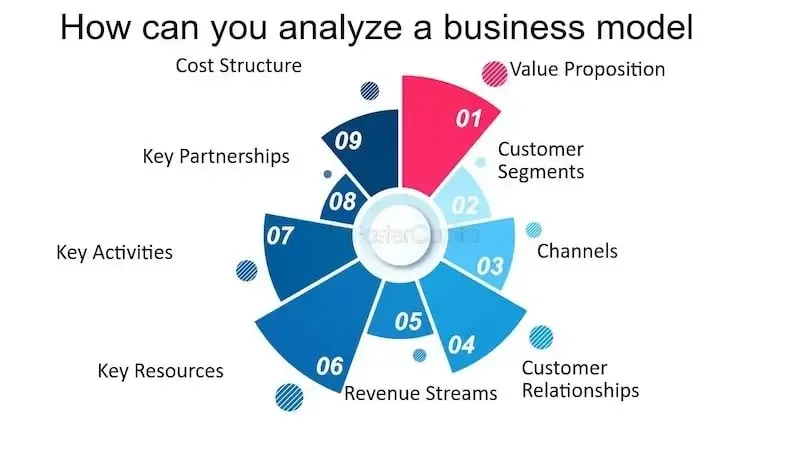
source: FasterCapital
Your business model will determine how is your MVP going to make money.
Will your product be ad-supported or will it be available one-off, or will customers need to sign up for a monthly (or annual) subscription?
These are the choices you’ll need to make as you build out your solutions and find a business model that works for your startup.
Even if you’re in the early stages, you should have an idea of how this thing will bring in revenue. It doesn’t have to be set in stone, but it should be realistic and aligned with your target customers.
So, where do you start?
First, think about what your ideal customer would actually pay for.
Since your MVP is solving a real problem you need to figure out how much are the customers ready to pay for a solution to that problem.
Let’s go over a few common models that work well for startups:
- Subscription – This is perfect if your product offers ongoing value. Think of apps people use regularly, like productivity tools or fitness apps. A small monthly fee can add up nicely over time.
- Freemium – Give the basic version away for free, and charge for premium features. This works well if you want to build up a user base quickly and then monetize the power users who want the extra perks.
- One-time Purchase – Maybe your MVP solves a very specific problem, and people only need to buy it once. Great if you have a straightforward tool or product that doesn’t need regular updates or extra features.
- Marketplace Model – If your MVP connects buyers and sellers, you can take a commission on each transaction. This works for platforms that match two types of users, like a job board or a service marketplace.
- Ad-Supported – If your target customers are cost-sensitive, but you’re expecting a high volume of users, ads might be the way to go. It’s not for everyone, but for some products, this can be a good option to consider.
Once you’ve got an idea of the model that best fits your MVP, think about scalability.
- Can this model grow with your product?
- Will you need to pivot as you add more features and users?
Having a business model in mind from the start gives your MVP a real direction and helps you avoid the “build first, figure out revenue later” trap.
Step 4. Wireframing, prototyping, and designing your MVP
The design of your MVP is one of the most crucial aspects.
It can literally make or break your MVP.
Let me give you an example.
You’ve worked through all the previous steps:
- You’ve clearly identified the problem you want to solve.
- You know exactly who your ideal customer is.
- You’ve selected the essential must-have features for your MVP.
But your MVP is not user-friendly. Although users want to use it, they struggle to find what they need and sooner or later they stop using the app.
It’s believed that for every $1 you invest in UX, you’ll get $100 in return.
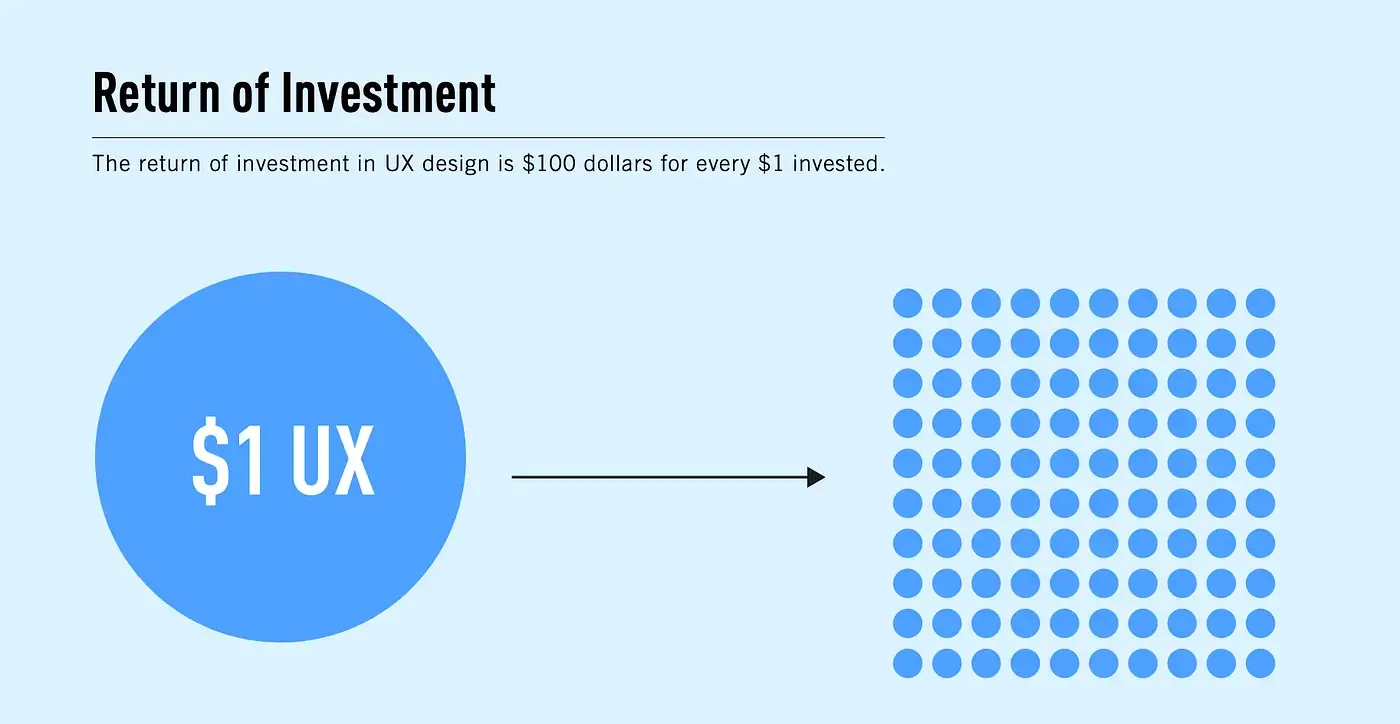
The ROI of UX Design, source: https://s3.amazonaws.com/coach-courses-us/public/theuxschool/uploads/The_Trillion_Dollar_UX_Problem.pdf
“Happy users are ultimately happy and returning customers.”
Clive K. Lavery, senior UX person and co-organizer, UX Camp Europe
The MVP design is extremely important but what does the design process look like?
4 steps of MVP design
Step 1. User research
User research is all about getting to know your users, and what they want.
It’s basically a process of visual prioritization.
It’s where you step into the shoes of your potential customers to truly understand their needs, frustrations, and expectations.
Without this step, you’re essentially building your product in the dark.
While keeping in mind a problem you’re trying you should:
- Conduct interviews: Talk directly to your ideal customer. Ask open-ended questions to uncover insights about their behaviors and needs.
- Conduct surveys: Use online surveys to gather data from a larger group. Ask about their preferences, pain points, and willingness to try new solutions.
- Rely on observation: Watch how people interact with existing products or systems. This can reveal unmet needs or areas for improvement.
- Analyze the Competition: Look at similar products on the market. What are they doing well? Where are they falling short? Understanding the competition can help you identify gaps your MVP can fill.
Great products aren’t built on assumptions.
User research will minimize the risk of creating something nobody wants.
Step 2. Wireframing
The first step in the actual design process is creating wireframes.
Wireframes are an initial sketch of your MVP’s UI.

Wireframes can be super simple, they can be done on paper with a pen.
The goal of this step is to get an idea of where are you going to place elements of your MVP.
Wireframes will help you lay out information architecture, user flow, and functionality.
Step 3. Creating mockups and prototyping
Once you’ve wireframed your MVP, you should make mockups.
Mockups are a basic static version of your app.
In this phase, you shouldn’t go into too much detail and spend hours designing every little detail since there might be some changes later in the process.
Mockups are all about creating a visual representation of your MVP in order to gather the initial feedback.
Mockups vs Lo-Fi prototyping vs Hi-Fi prototyping

Source: Justinmind
Lo-Fi prototyping
Lo-Fi prototypes are basic, often black-and-white clickable models of your MVP.
The goal is to prioritize structure and flow over design.
Great for testing early user interactions and refining user flow.
Hi-Fi prototyping
Hi-Fi prototyps are interactive and polished.
They should closely resemble the final product.
Hi-Fi prototypes should include detailed visuals, animations, and full functionality, making them ideal for usability testing and stakeholder presentations.
Step 4. Usability testing
Before your MVP design goes into the coding phase you should conduct usability testing.
Usability testing is a practice of how easy a design is to use.
Usually, a UX researcher acts as a moderator in an interview like with a single user or group of users.
The moderator will assign tasks to the users and monitor their behavior as well as ask for feedback.
Step 5. Develop a Minimum Viable Product (3 tips included by our experts)
This is where all your planning, designing, and strategizing starts to come to life.
Building your MVP is about creating a working product that includes only the must-have features.
Choosing the right tech stack for your MVP
Pick technologies that align with your goals, timeline, and budget.
You need to consider:
- Scalability
- Reliability
- Maintenance
- Talent availability
- Community support
- Complexity of the app
- Security.
This can be an extremely difficult task for a non-technical person.
#1 Tip: Our advice is to trust the expertise of your MVP development team.
Technical experts often have strong opinions, and too much research on your end could end up leaving you more overwhelmed than informed.
#2 Tip: Since so much depends on choosing the right tech stack, double-check the decision with at least a few other tech experts.
#3 Tip: One of the best ways to lower the cost of developing an MVP is by leveraging third-party tools and APIs.
Instead of building every feature from scratch, you can integrate existing solutions for functionalities like payment processing (e.g., Stripe), email notifications (e.g., SendGrid), or authentication (e.g., Firebase).
These tools are reliable, cost-effective, and save you time, so you can focus on your product's core value.
Step 6. Testing and QA
Before releasing your MVP, It’s absolutely critical to test it thoroughly.
Here are 3 basic types of testing:
#1 Functional Testing
Verify that all features work as intended.
Does the login process work? Are users able to complete key tasks without errors?
Do it over and over again.
Give it to other people, your spouse, friends, family members, and everybody you know.
Make sure they can use your app flawlessly.
#2 Test Across Devices and Platforms
If your MVP is accessible on multiple platforms like web and mobile, test its performance and compatibility across different devices and operating systems.
If something works in your web app, that doesn’t mean it going to work on mobile devices.
#3 Gather Feedback from Early Testers
Involve real users or beta testers in the QA phase. Their insights can reveal usability issues or areas for improvement you might have overlooked.
Step 7. Launch, monitor, and Iterate, Iterate, Iterate…
Once your MVP has been tested and polished, it’s time to launch! Woohoo!
Here is a 9-step process on how to launch your MVP successfully by Smartsheet.
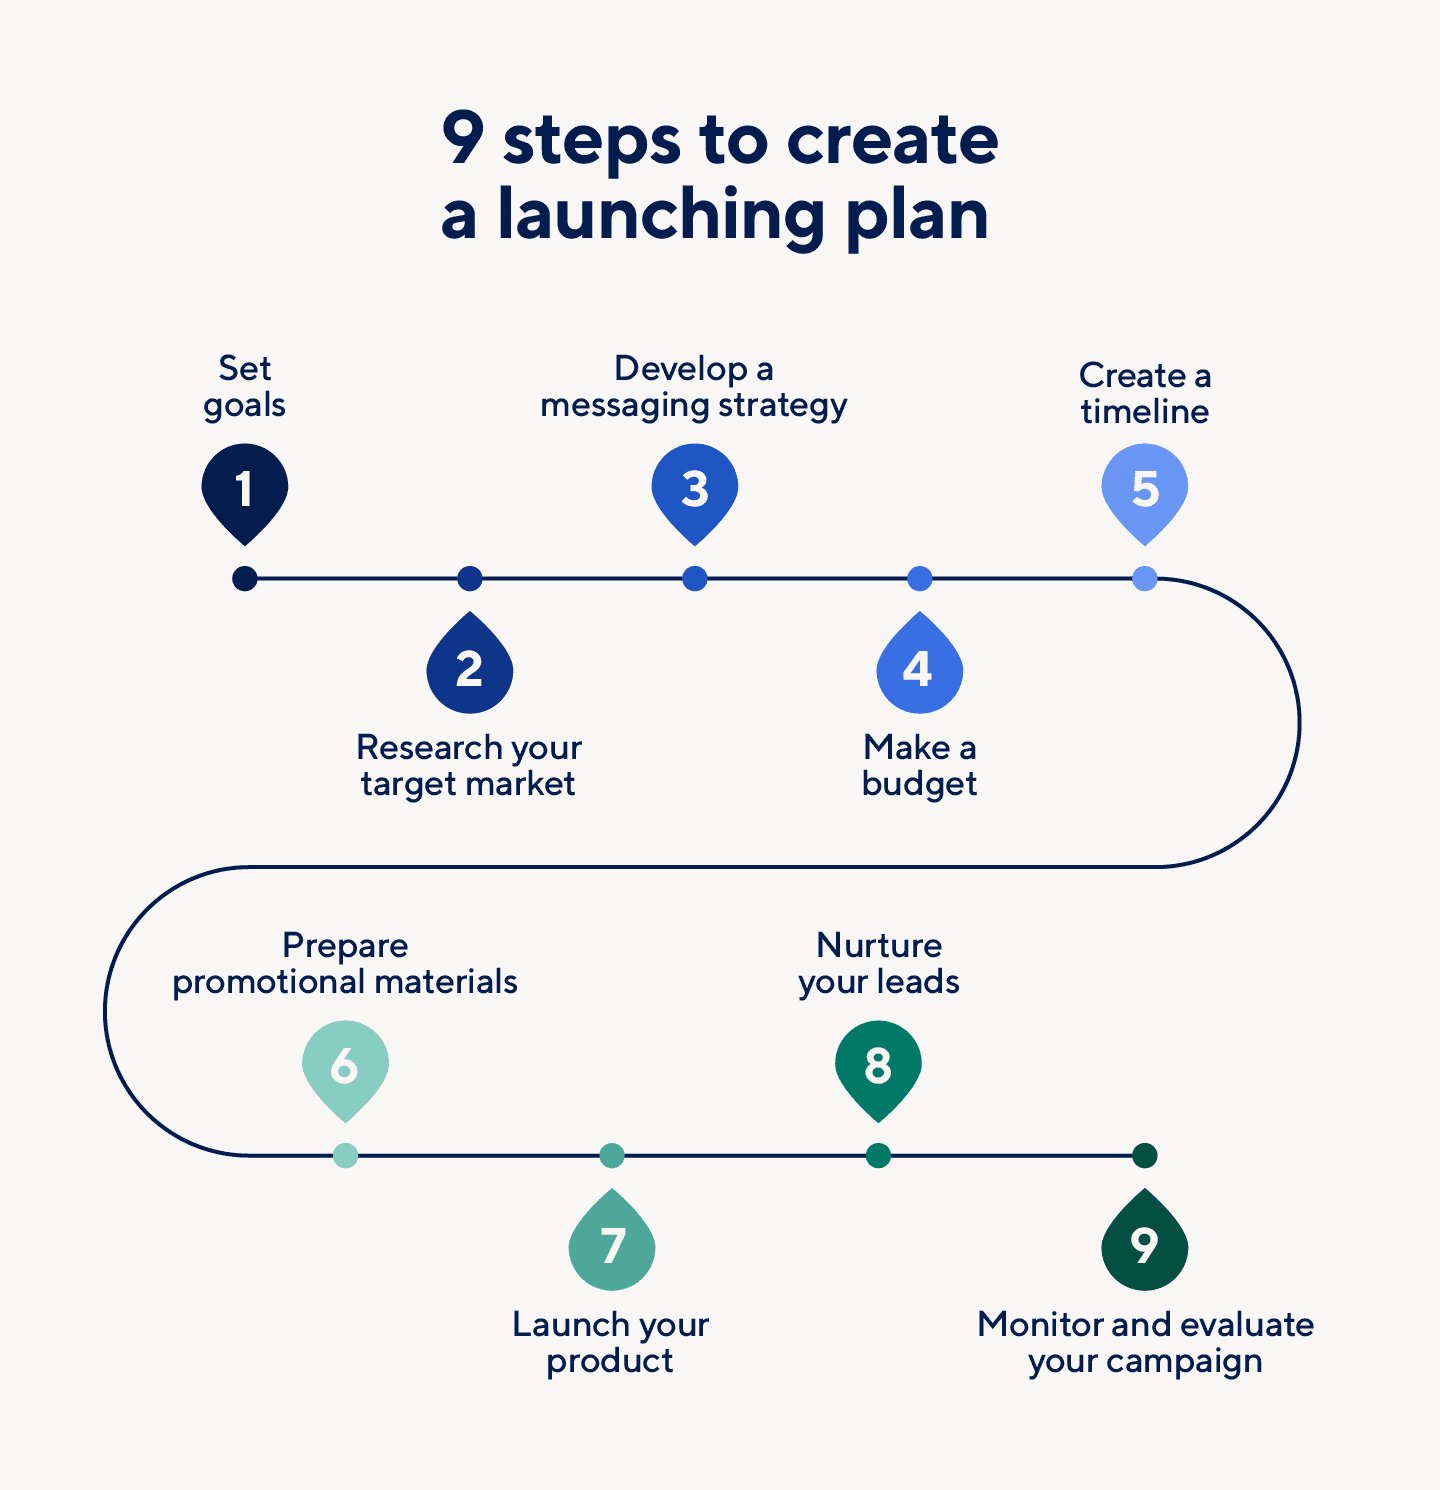
But remember, this is just the beginning of your product’s journey.
Now it’s time to collect feedback from your initial users and create new versions of your app.
MVP iteration process
Source: RubyGarage
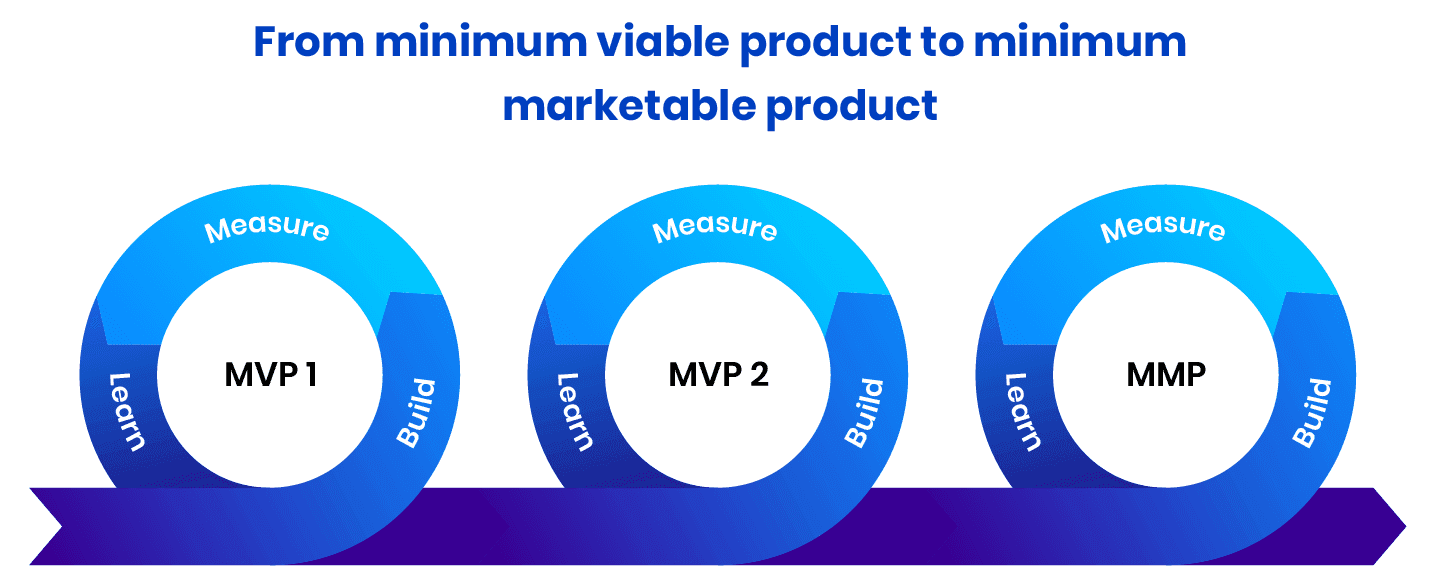
The core of the MVP iteration process is the build-measure-learn loop.
The goal of each iteration is to maximize learning while minimizing time and cost.
Start by setting up a hypothesis.
Build a feature and then measure success by collecting and analyzing user feedback through surveys, interviews, or analytics to determine if your hypothesis was successful.
Based on the results, decide whether to continue with the current approach, pivot to a new direction, or stop the iteration.
Pivoting a failing MVP product
In case your MVP product had a rough start the first thing that you need to do is understand “Why?” your MVP failed.
You can use various methods and tools to collect and evaluate feedback, such as surveys, interviews, analytics, user testing, and customer reviews.
After you analyze the feedback then you’ll have to define the new hypothesis.
Make the changes and test again.
How can you recognize the need for a pivot?
If your MVP is facing the following issues that might be a good sign that it needs to pivot:
- Low engagement
- Poor acquisition
- Underutilization
- Poor retention
- High churn rates
How much does it cost to build an MVP?
You guessed it, it depends.
Many factors can influence the price of MVP development.
Depending on complexity, on average an MVP will cost you:
| MVP | Features | Cost |
|---|---|---|
| Low-End MVP | A basic app or website with limited functionality, simple design, and minimal features. | $20,000 – $40,000 |
| Mid-Range MVP | A more sophisticated product with additional features, decent design, and mobile/web compatibility. | $40,000 – $80,000 |
| High-End MVP | A feature-rich MVP with complex backend systems, third-party integrations, custom design, and multi-platform support. | $80,000 – $150,000 or more |
Another key factor that impacts the cost of your MVP is quality.
Opting for the cheapest option may lead to higher costs down the road due to quality problems.
An experienced software development company might offer a higher initial price, but they’ll deliver the right product from the get-go.


Wondering how much your MVP will cost?
Use our free MVP cost calculator to get a tailor-made estimate.
Calculate MVP Costs
How long does it take to build an MVP?
Again, it depends on the complexity, but a general time frame you should be aiming for is two to four months.
MVP examples
Here is a list of successful products that were once an MVP:
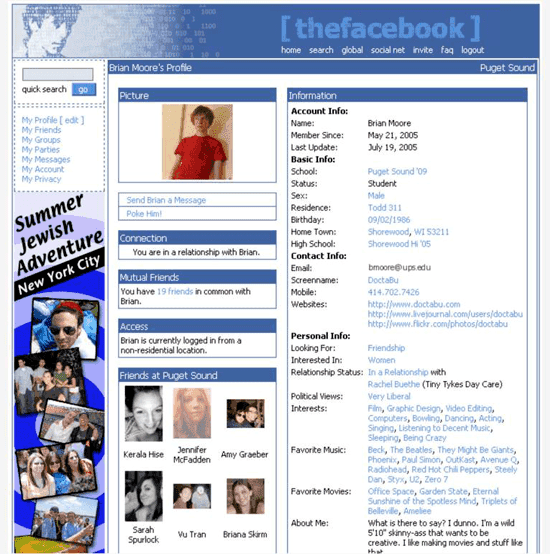
Facebook started as a simple website called "Thefacebook," aimed only at college students.
It had minimal features but validated the concept of an online social network.
Over time, additional features were added, and it grew into the global platform it is today.
Airbnb
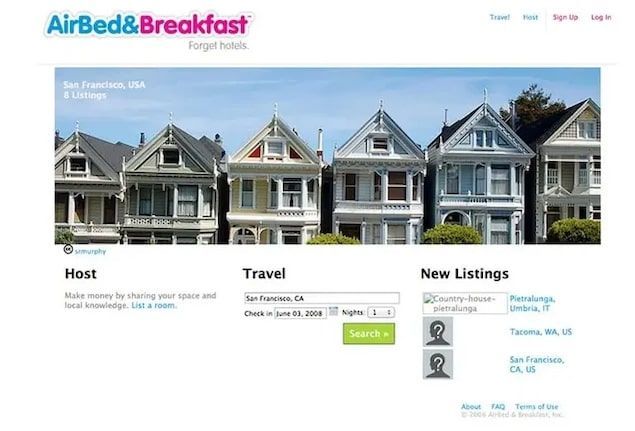
Airbnb began as a simple MVP.
It was a website where the founders listed their own apartments to rent out during a conference.
It was a basic solution to test whether people would be willing to stay in someone’s home instead of a hotel.
The early version had basic functionality, but it was enough to validate the idea.
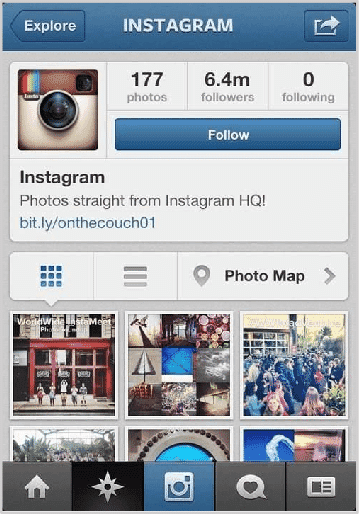
Instagram was originally a simple app called Burbn, which was a check-in and photo-sharing app.
The MVP focused on the photo-sharing aspect, which was the feature that resonated with users.
After gaining initial user feedback Instagram's founder realized that other than check-ins users really loved its photo filters.
Later on, Instagram got its fame by becoming the best photo-filtering app.
Twitch
Twitch started as an MVP called "Justin.tv,".
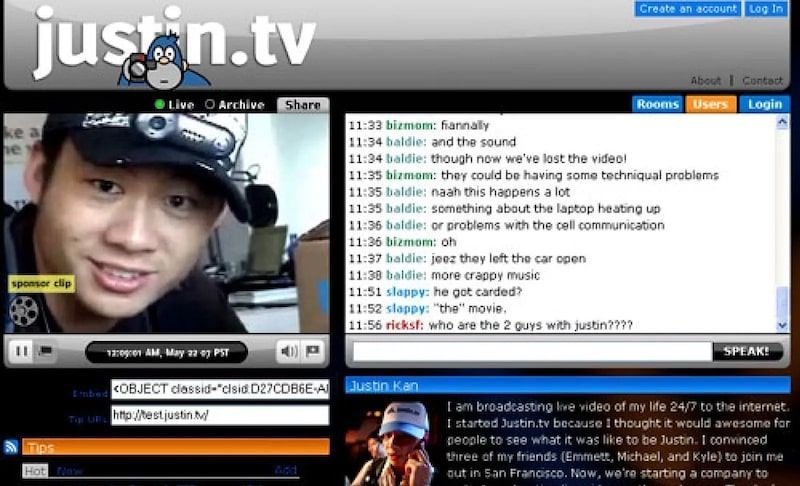
It was a “big brother” type of app, where you could watch Justin (the founder) on live steam throughout the day.
Later on, Twitch founders pivoted gaming-focused channel that gained the most traction.
Frequently Asked Questions on MVP Development
Should I outsource MVP development or build in-house?
This depends on your resources and expertise. Outsourcing to an experienced development team can ensure quality and faster time-to-market, while in-house development offers more control.
What is the difference between an MVP vs a Prototype?
A prototype is simply a mockup meant to describe the visual aspects of the final products. It is usually not a functional product while an MVP is a functional product with the core features.
How to start developing MVP?
Before diving into MVP development, it's crucial to define the scope and consult with experts. At globalsoft, we provide free product discovery sessions to help you get started. Simply schedule a call with us!


